Virtual Box: Running Your Own Virtual OS

Virtual Box is a free, open-source virtualization piece of software from Sun Microsystems (Now Oracle) that allows you to install and run a second operating system on your PC in a virtual enviroment. Virtual box runs on several operating systems natively, the list includes Windows, Linux, OSX, and Open Solaris. So if you’re running any one of those, you’re able to download the Virtual Box software and install what Virtual Box calls a “Guest Operating System”.
The list for available operating systems that can be installed under Virtual Box is pretty massive. It covers several flavors of the Windows operating system family; Windows 7, Vista, 2000, Server 2003 and 2008, XP, and NT. In those Windows versions the 32 bit and 64 bit versions are both compatible. They mention 98, but it apparently has some issues, surprisingly (not really) there is no mention of ME. There are too many flavors of Linux to even mention, it looks like the current big name players are all listed from Ubuntu, Fedora, Red Hat, SUSE. OSX is another operating system you can install to your virtual machine. The amount of options that you can install from your OS to another OS are pretty huge, and best of all this is an open-source, heavily documented and free piece of software.
There are a ton of uses for having a virtual operating system on your PC, the biggest of those is for developers to have multiple operating systems at their fingertips in an easy and fast launch enviroment. It’s a great and quick way to test out different operating systems for whatever you’re working on. Web development and different browsers and operating systems is probably one of the biggest reasons and uses for having a virtual machine. Testing other installable software pieces and working in development enviroments not native to your installed OS is another great reason. Being able to develop for the iPhone without a Mac under Virtual Box is a possibility that many users may want to look at if they’re looking to test that out.
Installing Virtual Box is very simple. You will need a couple of things before you go forward with installing the software. The first of those things is checking for hard drive space. You will want to give yourself enough room to install the operating system and have some extra room for software and whatever else you might need. You’d probably want to give yourself at a minimum 10 to 15 gigs of free space, so move or delete things and make sure you’ve got the space before you bother to download Virtual Box, which can be found in the link I’ve provided here. Once you’ve got your space free and Virtual Box downloaded you’ll want to go ahead and grab your guest operating system of choice. Those installs can be done from the installable media of your operating system of choice. Another option is to get a pre-built image for your guest operating system, which is a great option. You can check out some of those pre-built images here. Check the main website of your guest operating system for the ISO image or grab the media you have on hand and we’ll start the installation process.

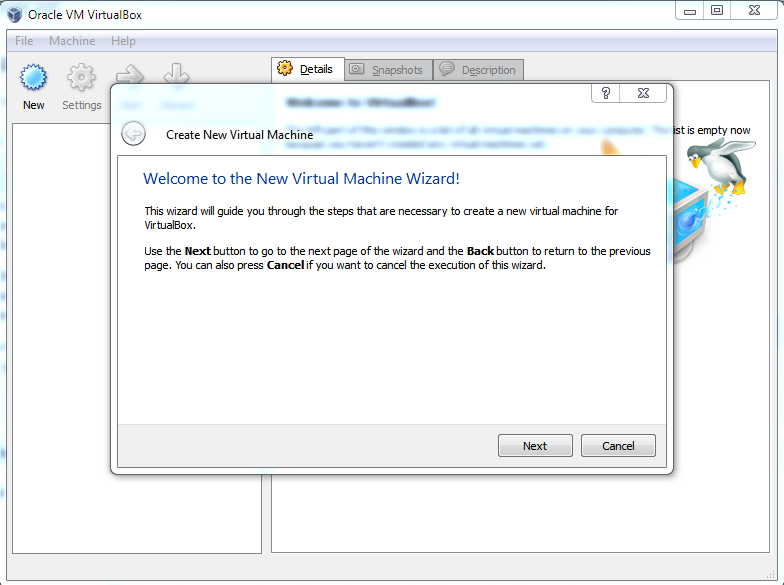
Double click the Virtual Box installer to start the installation, let it go through and agree with everything, just your basic installation. Once that is done launch the application and we’ll begin installing a guest operating system. In these examples we’ll go with Ubuntu as our OS. Once Virtual Box loads, click on New on the top left hand side, you will be greeted with a New Virtual Machine Wizard window with an option of Next or Cancel, click Next.
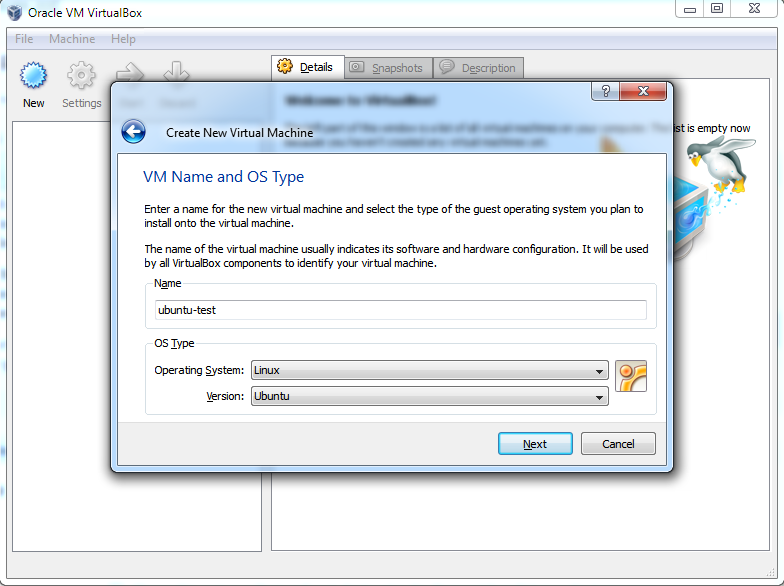
You’re now able to name the virtual machine and select the operating system that you will be installing. We’ll go ahead and name it ubuntu-test as we’re testing out Ubuntu. You’ll want to select Linux and Ubuntu from the menu below. Go ahead and click next and you’ll move on to the memory selection slider bar. Here you will decide how much RAM to delegate to your virtual operating system when it is running. I went with 1 gigabyte, that’s 1/4th of my entire amount of RAM and should be enough.

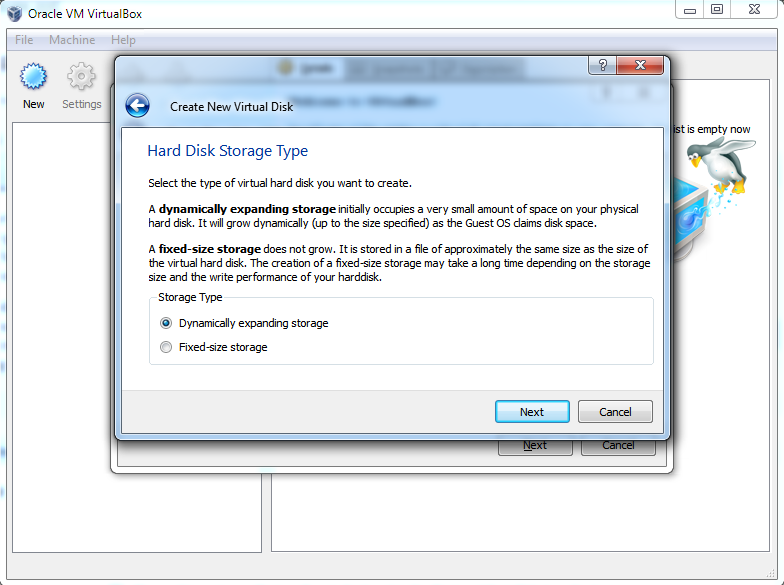
You now have to select where to install the operating system on your PC. This being your first time I will assume you will want to select the box for Boot Hard Disk and click the radio button for Create new hard disk and then click Next. The Hard Disk Storage type screen comes up now and you will need to decide what kind of disk to create. For this example you’ll want to select a fixed-size storage versus a dynamically expanding storage. It being a virtual machine you’re not going to be adding a ton of data to it, so go ahead with a fixed size. You’ll be given a slider to select the drive size you want, go ahead and give it the amount that you previously decided on using, go ahead and click Next. On the next screen click on Finish and wait for the drive to be created.

The next thing will be to actually add your Ubuntu iso to the virtual disk you’ve created. Click on Settings and then click on Storage and select your Ubuntu ISO file. Once you do that, just double click on your Ubuntu guest operating system virtual drive to start up the disk. It will boot like you’ve started the Live CD from your optical drive. Once it boots up, go through the normal directions Ubuntu provides to install that Live disk to the hard drive. Then you’re set with your virtual Ubuntu enviroment.
It’s a pretty easy system to follow to get to test and play with other operating systems on your PC. It may not be for everyone and you will need some space and a decent machine to get any performance out of the guest operating system. But for those of you interested and those of you in need of an alternate enviroment for fun or work, it is a great and free tool to use.
